Hand Drawn Lines Patterns Vol.2 – A Practical Guide to Avoiding Common Mistakes
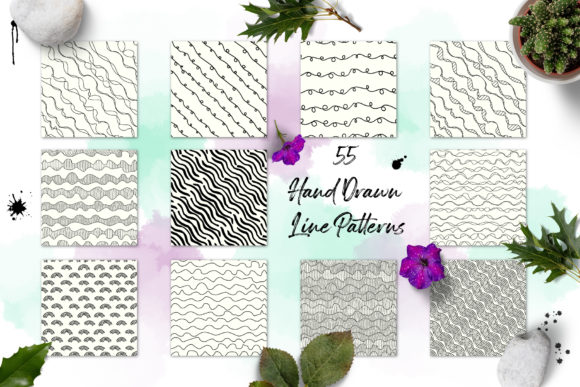
Pattern sets promise convenience, but using them effectively requires more than just downloading files. Hand Drawn Lines Patterns Vol.2 offers 55 ready-to-use seamless line patterns, yet many creators run into avoidable problems that waste time and compromise results. This article walks through the most frequent missteps and shows how to get the most out of this versatile collection.
Understanding What Makes This Set Different
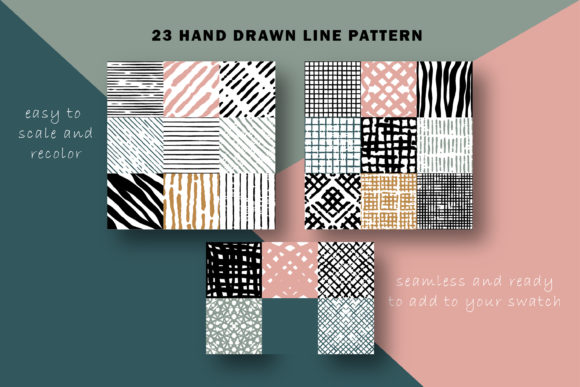
Not all pattern collections are created equal. This volume stands out because every pattern is hand-drawn, giving it an organic, textured feel that machine-generated lines rarely achieve. It includes vector files (AI and EPS) as well as high-resolution PNGs with transparent backgrounds. Many buyers mistakenly assume they can treat these like any other pattern pack, ignoring the specific strengths and requirements of each format.
If you have ever tried to fit a generic geometric pattern into a hand-lettered project and felt the mismatch, you know why hand-drawn lines matter. The subtle unevenness in stroke weight and spacing adds warmth and personality. Understanding this upfront helps you choose the right patterns for your intended use.
Ignoring Software Compatibility – A Costly Oversight
The AI file requires Adobe Illustrator CS5 or newer. A surprising number of creatives discover this only after struggling to open the file. If you rely on an older version of Illustrator or a different vector application altogether, the EPS10 file is your friend. It opens in CorelDRAW, Affinity Designer, Inkscape, and most other vector software. Yet many users never check and get stuck trying to import a .ai file into a program that does not support it.
Before purchasing or downloading, confirm your editing environment. If you use a tablet app like Procreate, the PNG files will serve you better. The EPS and AI files are grouped and ready for editing, but compatibility is the first gate. A quick check can save you an hour of frustration.
Underestimating Resolution Requirements for Print
The PNG files measure 5000 by 5000 pixels at 600 DPI. That is ample for large-format prints like posters, fabric swatches, or wall art. However, inexperienced users often scale these images up past their native size, expecting the same crispness. While 5000px is generous, pushing a pattern to billboard size without vector conversion will introduce blur.
If your project needs extremely large output, use the vector files instead. Scale them infinitely without losing quality. For standard printing tasks, the PNGs deliver exceptional clarity. The lesson: match your file format to your scale requirements. Reserve PNGs for sizes up to about 24 inches, and switch to vectors for anything bigger.
Misunderstanding Seamless Tiling – It Is Not Automatic
Hand-drawn seamless patterns are carefully constructed so that edges match perfectly when repeated. But that does not mean they tile themselves inside your design software. A beginner might drop a single tile onto a canvas, assume the pattern only works as a standalone square, and miss the ability to fill large areas.
In software like Illustrator or Photoshop, you need to apply the pattern as a fill or use the "Define Pattern" command. The vector files already contain the pattern as a swatch, but if you import the EPS and it does not automatically appear, you may need to open the swatches palette and load the pattern. Test it by creating a large rectangle and applying the fill. If edges show a visible line, you might have altered the tile inadvertently. Stick to the original dimensions until you have confidence.
Editing and Recoloring Without Losing Work
Each element in the vector files is grouped, making it easy to recolor separate line sets. A common mistake is ungrouping everything immediately. That strips away the organization, leaving hundreds of individual paths. When you later decide to change a color group, you have to select each line manually.
Instead, keep the groups intact. Use global swatches so that updating one color updates all instances. For example, if a pattern uses three line thicknesses, each thickness is likely in its own group. Select that group, assign a new color, and the pattern updates instantly. This approach also preserves stroke settings. If you accidentally ungroup, you risk losing stroke alignment or having lines break apart.
Choosing the Wrong Pattern Density for Your Medium
The set includes patterns ranging from sparse, airy lines to dense, intricate webs. A typical mistake is using a highly detailed pattern in a small space, such as a planner sticker or a postcard. The lines become cluttered and the design loses readability. Conversely, a thin, widely spaced pattern on a large poster can look underwhelming.
Before applying a pattern, consider its intended viewing distance and role. For packaging, a moderate density often works best so the pattern does not compete with product text. For social media graphics, simpler patterns read well on mobile screens. Test the pattern at the actual size you plan to use. Scale it up or down within your software to find the sweet spot where the hand-drawn quality remains visible without overwhelming other elements.
Overlooking Transparent Backgrounds in PNG Files
The PNG files come with transparent backgrounds, a major advantage for digital scrapbooking, web design, and overlays. Yet many people still place these images onto white backgrounds, never exploiting the transparency. If you are creating blog headers or printable sticker sheets, you can layer the pattern over photos or colored backgrounds seamlessly.
Save yourself the masking work. Drag the PNG onto a new layer above your background element. Adjust opacity if needed. The 600 DPI resolution means the edges stay sharp even after resizing. For projects requiring a solid color behind the pattern, fill the background separately instead of merging it into the pattern file.
Failing to Test Scale Early in Your Workflow
Patterns look different at different scales. A mistake many designers make is committing to a pattern fill and then realizing halfway through a layout that the tile size does not match the overall composition. This often happens with book covers or branding materials where proportion matters.
In vector software, create a preview rectangle that matches your final output dimensions. Apply the pattern fill, then adjust the scale using the transform tools. For the PNG files, you can resize the pattern layer in Photoshop and control how it repeats. The goal is to see the pattern in context before building the rest of your design. Once everything else is in place, changing the pattern scale may require significant reworking.
Underutilizing the EPS Format
Many creators overlook the EPS file, thinking it is outdated. In reality, EPS10 is widely supported and often more reliable than AI files when moving between different vector programs. If you work with a mix of software or need to share files with collaborators who use Affinity Designer or CorelDRAW, EPS is your safest bet.
The patterns in the EPS are grouped and editable just like the AI versions. Do not discard the EPS folder. Keep both for flexibility. For example, you can open the EPS in an older version of Illustrator that does not support AI CS5, or use it in a non-Adobe workflow. It is a backup you will appreciate when compatibility issues arise.
Overloading a Project with Too Many Patterns
Hand Drawn Lines Patterns Vol.2 offers 55 distinct styles. It can be tempting to use several in one project, especially when brainstorming branding or web design. Too many varied line patterns, however, can create visual noise and dilute your message. The result looks chaotic rather than curated.
Limit yourself to one or two complementary patterns per project. For example, use a delicate line pattern as a subtle backdrop for a blog and a bolder version for call-to-action buttons. Keep the line weights and spacing consistent to maintain harmony. If you need variety, vary the scale of the same pattern rather than switching to a completely different one. This approach strengthens brand recognition and keeps the hand-drawn aesthetic cohesive.
By sidestepping these common pitfalls, you can unlock the full potential of this pattern set. Whether you are printing on fabric, designing a planner cover, or building a social media presence, a little forethought about file formats, scaling, and editing habits makes the difference between a frustrating experience and a smooth, professional result.